#Divi Wireframes
Explore tagged Tumblr posts
Visit Tumblr Blog
Explore Tumblr blogs with no restrictions, modern design and the best experience.
Last Seen Tumblr Blogs


Fun Fact
Tumblr posted its first advertisements in May 2012 and subsequently earned $13M in revenue.
Text
#Divi Membership#Divi Members#Divi Subscribers#Divi Child Themes#Divi Layouts#Divi Hero Sections#Divi Wireframes#Divi Skeleton
0 notes
Text

Divi for Beginners: A 2025 Guide to Building Beautiful WordPress Sites
Divi has long been a favorite among WordPress users for its intuitive design capabilities, drag-and-drop builder, and vast customization options. For beginners stepping into website creation in 2025, Divi offers an ideal balance of power and simplicity. Whether you're launching a personal blog, a portfolio, or a business site, Divi makes it easy to create professional and visually stunning websites—without needing to code.
Starting your journey with Divi is even more rewarding when paired with a reliable WordPress website development service from India, a process that helps you build a strong foundation from day one.
Why Choose Divi as a Beginner?
Divi stands out for several reasons:
Visual Builder: A true front-end editing experience that lets you design live.
Pre-made Layouts: Hundreds of ready-to-use designs that can be customized to fit your brand.
Responsive Design: Mobile-friendly options are built in.
Support and Community: Massive support network and a large online community.
Regular Updates: Divi continues to evolve, with new features added regularly.
These features make Divi one of the most beginner-friendly WordPress themes out there. Its visual simplicity masks the powerful capabilities under the hood.
Getting Started with Divi in 2025
To begin using Divi:
Install WordPress on your chosen hosting provider.
Purchase and upload the Divi theme from Elegant Themes.
Activate Divi and access the visual builder.
Choose a layout or start from scratch.
Customize content using the drag-and-drop interface.
Even if you’re not tech-savvy, Divi makes site setup remarkably intuitive. From adding sections to adjusting styles, the learning curve is surprisingly gentle.
If you're aiming for a unique look, investing in custom WordPress theme design can give your site a completely tailored feel while maintaining ease of use.
Easy Wins for Beginners with Divi
Here are a few tips to speed up your learning process:
Use Layout Packs: These are bundled design templates that save hours of work.
Global Styles: Set fonts and colors globally to maintain consistency across your site.
Responsive Preview Mode: See how your site looks on mobile and tablet before publishing.
Save Your Designs: Reuse sections or pages you've designed by saving them to your Divi Library.
Use the Wireframe View: When layouts get complex, this view helps manage modules easily.
Experiment Safely with Divi Cloud: Store designs in the cloud to test and reuse across projects.
These small steps make a big difference in reducing development time and improving design efficiency.
Essential Divi Modules to Explore
Divi’s modules are content blocks you can add to your site. Some beginner-friendly ones include:
Text and Image Modules – Ideal for basic content and visuals.
Buttons and Calls to Action – Drive engagement with clear clickable prompts.
Sliders and Galleries – Perfect for showcasing images or featured content.
Forms for Lead Capture – Use these to collect emails or feedback.
Testimonials, Counters, and Blurbs – Great for service-based or portfolio websites.
Each module is customizable, and real-time editing means you always see what the final result will look like.
Divi Theme Tips for Better Design
Use Whitespace: Don’t overcrowd sections. Give elements room to breathe.
Stick to a Color Palette: Keep design cohesive with a limited color range.
Choose Readable Fonts: Prioritize clarity over style.
Compress Images: Use tools or plugins to reduce file size and speed up loading times.
Add Animations Sparingly: Animations can enhance UX but overusing them distracts users.
Avoiding Common Beginner Mistakes
Overcomplicating the Layout: Keep your designs simple. Less is more.
Ignoring Mobile Optimization: Always check how your site looks on smaller screens.
Skipping Backups: Use a plugin or service to back up your site regularly.
Not Using Global Elements: These help maintain design consistency and save editing time.
Forgetting SEO Basics: Use good titles, alt tags, and clean URL structures.
Neglecting Site Speed: Optimized media and minimal plugins help maintain performance.
Blogging and Content Management with Divi
If you're building a content-heavy site like a blog or online magazine, Divi has excellent support:
Blog Module – Display posts with different layouts.
Category Filters – Organize content by topics.
Search and Sidebar Widgets – Improve navigation and user experience.
Custom Post Layouts – Create a unique look for blog entries.
Starting your blog on Divi also familiarizes you with WordPress’s content management strengths.
Expanding Your Divi Site
Once your site is live, consider enhancing it with:
Third-party Divi plugins to extend functionality.
E-commerce integrations with WooCommerce.
Landing pages for lead capture and marketing.
Email marketing services integration like Mailchimp or ConvertKit.
Scaling a Divi site is easy as your needs grow.
When to Seek Expert Help
As you grow more confident with Divi, you might want to implement more advanced features. That’s when it makes sense to hire Divi theme expert who can help you scale your site’s functionality and aesthetics without losing simplicity. Whether it's custom modules or deeper design tweaks, a skilled professional can save you time and stress.
Conclusion
Building a WordPress site with Divi in 2025 is a rewarding experience—especially for beginners. Its visual builder, flexibility, and built-in features make website creation approachable and enjoyable.
By learning the basics, exploring its modules, and applying thoughtful design practices, you can craft a professional-looking website without needing a background in web development. Use this guide to kick-start your journey and evolve your skills over time. Happy building!If you’re interested in how I use Divi for various web projects or want to see real-world designs, feel free to check out some of the examples I occasionally share over on Instagram.
0 notes
Text
0 notes
Photo
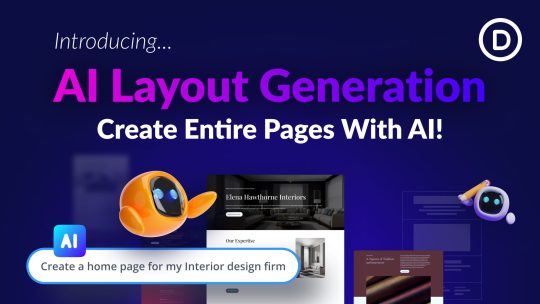
(via New! Divi AI Create Complete Pages With A Simple Prompt It’s that easy.)
Tell Divi AI about the page you want it to create, along with some information about your business, and it will get to work building the page you envisioned. Behind the scenes, Divi AI goes through a series of thought processes and implementation steps to create your page, just like a real web designer. It conceives an outline, turns it into a wireframe, customizes the wireframe by adjusting fonts and colors, fills the template with content based on the outline and your website information, and generates contextual images for each section matching your color scheme.
0 notes
Text
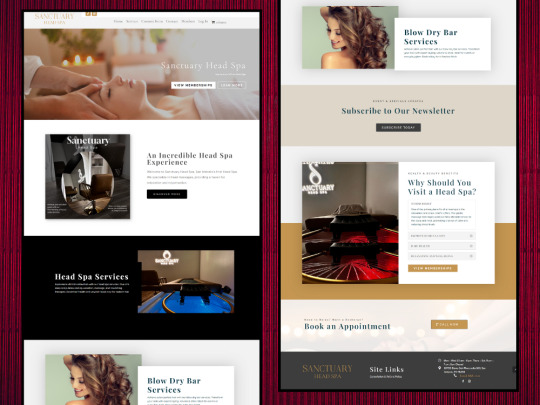
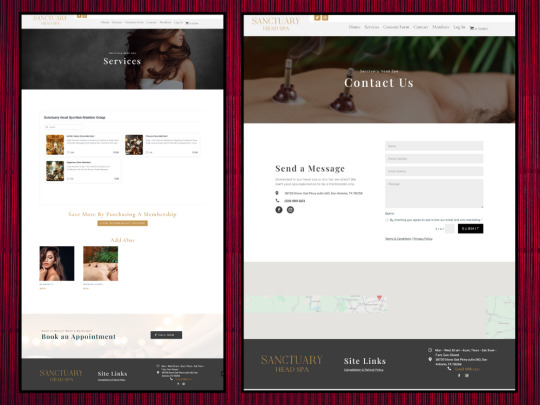
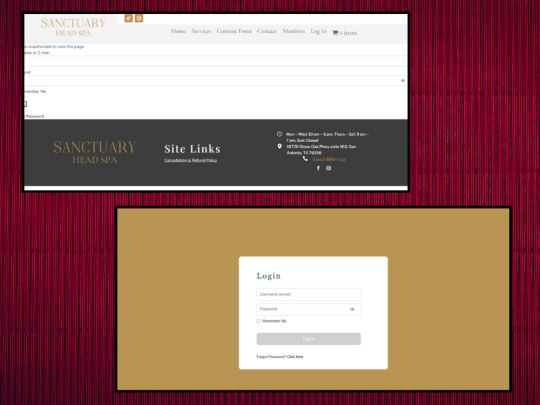
Divi Wordpress Web Experience with Sanctuary Head Spa
Project description. I recently completed a WordPress-based website for Sanctuary Head Spa using the versatile Divi theme from Elegant Themes, paired with the Wireframe Kit Super Theme. The goal of the project was to create an inviting, luxurious, and fully responsive platform that perfectly reflects the calming and rejuvenating atmosphere of Sanctuary Head Spa. By utilizing Divi’s customization tools, I was able to deliver a clean, modern interface that elevates the spa’s brand while ensuring a seamless user experience on all devices.

youtube
Divi Wordpress Web Experience with Sanctuary Head Spa I recently completed a WordPress-based website for Sanctuary Head Spa using the versatile Divi theme from Elegant Themes, paired with the Wireframe Kit Super Theme. The goal of the project was to create an inviting, luxurious, and fully responsive platform that perfectly reflects the calming and rejuvenating atmosphere of Sanctuary Head Spa.
The homepage is designed as a soft introduction to the world of head spa treatments, featuring visually appealing hero sections, soothing imagery, and intuitive calls-to-action that invite visitors to explore Sanctuary Head Spa’s unique offerings.Custom Functionality and Features
To enhance customer engagement, I integrated a fully functional booking system that allows users to schedule appointments directly from the website, offering a seamless process from exploration to booking.
This project for Sanctuary Head Spa encapsulates the power of a thoughtfully designed WordPress website, combining the best of Divi, Elegant Themes, and the Wireframe Kit to create a visually engaging and functional online presence.
Feel free you can visit my website:
If you want a website for your business you can hire me on upwork:
0 notes
Text
How to Create Flip Cards with Any Module in Divi Without a Plugin
Flip Cards are a fun way for users to interact with your website. Not only does it provide a cool flip animation, it also allows you to offer additional information in one concise location. In this tutorial, I’m going to show you how to turn Divi Modules into flip cards without using a plugin! With this method, you will be able to use one Divi module as the front of a card and another Divi module as the back of a card. You can even design each module (front and back) however you like using the divi builder. The functionality is accomplished through just a few snippets of CSS (no jquery).
I think you will be surprised at just how simple and fun building these cards can be.
Let’s dive in!
Sneak Peak
Here is a sneak peak of the design we will be building today.
What You Need for This Tutorial
All you will need for this Tutorial is Divi! No plugin needed. We will also be using the App Developer Layout Pack which is FREE and available within the Divi Builder.
The Basic Idea Explained
The inspiration for this concept actually came from this basic example of how to design flip cards. All it took was a little re-engineering to assign the div classes to Divi rows, columns and modules and then clean up the CSS a bit.
The Divi layout consists of a regular section with four one-column rows. In each row, I added two blurb modules stacked on top of each other (although any Divi module would work as well). The top blurb serves as the front of the flip card and the bottom blurb serves as the back of the flip card. By applying “display:flex” to the section, the rows are structured horizontally like columns. This allows to the cards to be aligned side by side into four columns.
Here is what the setup looks like before we add the custom CSS.
Then I added the custom CSS to page settings and added the corresponding CSS classes to each row, column, and module.
That’s it!
Creating Divi Flip Cards Using a Premade Layout
Adding the Premade Layout to Your Page
To get things rolling, go ahead and create a new page, give you page a title, and then click to use the Divi Builder. Select the option “Choose a Premade Layout”. From the Load from Library popup, select the App Developer Layout Pack and then click to use the App Developer Landing Page layout.
Once the layout loads to the page, publish your page and then click the button “Build on the Front End”. Now you are ready to start creating the Flip Cards.
Setting up the Section, Rows, and Modules
Under the first section of the layout, add a new regular section with a one-column row. Don’t add any modules yet. Open the row settings and update the following:
Custom Margin: 20px bottom Custom Padding: 0px top, 0px bottom
Save settings.
Then duplicate the row three times so that you have a total of four rows in the section.
Now open the section settings and add the following custom CSS to the Main Element:
display:flex;
This changes the rows to display horizontally which basically converts our rows into four columns even though technically they are still Divi rows each with one column.
Adding the Modules to the Rows
This is where our premade layout comes in handy for this tutorial. We will use the four blurb modules in the top section of the layout to jumpstart the design of our flip cards. Using the right click options or the shortkeys ctrl+c and ctrl+v (windows) and cmd+c cmd+v (mac), copy and paste the premade modules into each of the rows we just created. Make sure that each row has duplicate versions of the same module.
Now your section should look like this.
Designing the Front and Back Flip Card Modules
The two modules stacked in each row will be used as the front and back of the flip cards. The top module in each row will serve as the front and the bottom module will serve as the back. Since the design of the front card (top module) is already done thanks to our premade layout, all we need to do is adjust the design and content of the back card (bottom module).
Using Divi multiselect feature, select all bottom modules in each row and then open the element settings to customize all four modules at the same time.
Now we can update the element settings options to style the back version of our flip cards. Update the element settings as follows:
Content: “This is a description.” Background Color: #00a2fa Text Color: Light
Adding Custom CSS and CSS Classes
Now it’s time for the custom CSS that will give us the flip card functionality. Open the page settings and add the following Custom CSS:
@media (min-width:980px){ .flip-box-row { background-color: transparent; width: 250px; height: 250px; perspective: 1000px; } .flip-box-column { position: relative; width:100%; height: 100%; transition: transform 0.8s; transform-style: preserve-3d; } .flip-box-row:hover .flip-box-column { transform: rotateY(180deg); } .flip-box-front, .flip-box-back { position: absolute; width:100%; height: 100%; backface-visibility: hidden; } .flip-box-back { transform: rotateY(180deg); } }
Notice that the above CSS classes are named in a way that should help you understand what each is doing. It is also a helpful indicator as to where we need to add those CSS classes to our Divi elements. For example, the class “flip-box-row” is meant to style each of the four rows; therefore, each row needs to have that CSS class.
Adding CSS Classes to the Divi Elements
Using Multiselect, select all four of the top modules (front cards) in each of the rows. Then add the following CSS class:
CSS Class: flip-box-front
Then, use multiselect to select all four of the bottom modules (back cards) in each of the rows and add the following CSS Class to those modules:
CSS Class: flip-box-back
Lastly, use multiselect to select all four rows and give them the following CSS Classes:
CSS Class: flip-box-row Column CSS Class: flip-box-column
Final Design on Desktop
With all our CSS classes added, our flip cards are fully functional. Check out the final design on desktop.
Customizing the Design for Mobile
In the custom CSS code that we already added to the page settings, there is a media query that limits the flip card functionality to desktop only. However, we still need to hide the front versions of our flip cards on tablet and smartphone as well as make sure our rows stack nicely when adjusting browser widths.
To hide our front card blurb modules, use multiselect to select all of the top modules (front cards) in each row (this will be easier in wireframe view mode since things will be moving around in the front end builder) and update the following:
Disable on: Phone and Smartphone
Then open the section settings and add one more line of CSS to the main element in addition to the one added previously:
flex-wrap:wrap;
This will make sure the rows will stack on mobile.
Now let’s check out the final design on tablet and smartphone.
Bonus Option: Vertical Flip Cards!
If you want your flip cards to flip vertically instead of horizontally, you only need to change a two letters (literally) in the custom CSS. Open the page settings and locate the two places where “transform: rotateY(180deg)” is being used. Then replace the “Y” with “X”. If you haven’t guessed already, this changes the rotation to rotate on the X axis instead of the Y axis.
Pretty cool stuff! Check out the result.
Final Thoughts
You don’t have to resort to a plugin to create great looking Flip Cards in Divi. With this tutorial, you have a framework to create countless designs and combinations of flip card content. Don’t forget that you can choose any two modules to serve as the front and back of your cards. So feel free get creative!
I hope this was helpful and I look forward to hearing from you in the comments below.
Cheers!
The post How to Create Flip Cards with Any Module in Divi Without a Plugin appeared first on Elegant Themes Blog.
😉SiliconWebX | 🌐ElegantThemes
2 notes
·
View notes
Text
Avoid Custom WordPress Themes! Find Out Why?
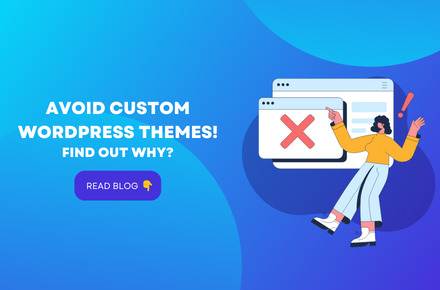
Creating a Custom WordPress theme requires a basic understanding of HTML and CSS. However, for users with little or no knowledge of web design, themes like Divi and Astra are great options since they offer tons of customization and premade themes.
First of all, not all websites are created equal. It would be wise to build a custom site if you fall into a particular niche where only a custom site can meet your needs. However, customizing is optional for 95% of use cases. So I’ll close with a better answer for you to consider. Here are four big reasons to reconsider a custom WordPress theme.
Reasons Custom WordPress Theme Is A Bad Idea.
1. Too Expensive
What comes to mind when you assume how difficult and expensive creating a new website will be? A few thousand dollars? What’s the timeframe? Forget both of those notions if you choose a custom solution. To build your own WordPress theme, you’ll need to shell out at least five figures in USD.
You get the picture. Custom WordPress themes cost more than prebuild themes if you want all the features a decent theme has
2. It Takes A Long Time To Build
The process of creating a custom WordPress theme is a bit longer as there are a lot of steps involved, like…
Creating wireframes
Planning out the website structure
Start Designing
As a result, Custom WordPress themes require a strong understanding of HTML, CSS, and JavaScript. In addition, it is often necessary to deal with bugs and coding headaches during development.
3. Requires Ongoing Support To Manage
As a result, your website visitors may be deceived. Additionally, when a theme, plugin, or WordPress is updated, it may malfunction occasionally. Due to this, it may conflict with your site theme, so ongoing support is required to maintain this smoothly.
4. Updates Can Break Them
It has several issues:
There may be double navigation on the desktop.
Issues with mobile responsiveness
Pages had vanished
Several images suddenly broke and would not load
Internal links will start taking people to 404 pages when the destination pages still exist.
Some page templates can stop loading the way they were built initially, and formatting was all over the place (fonts, colors, margins, etc.)
Pros & Cons Of Custom WordPress Theme Pros:-
These Custom Designs Are Built With Your Website In Mind, Not The Other Way Around.
Assuming nobody copies your design, these customizations will be unique, helping brand your website.
You’ll have access to more excellent support during the design and development process, and the website design will likely be implemented for you. That means you have less to do on your own.
Cons:-
Hiring a web developer or designer can cost you several thousands of dollars. In addition, you might have to continue paying in the future for additional support rather than paying a single fee for a theme once.
Custom designs take a much longer time to build. You can’t download them on demand, and you could expect to spend weeks or months waiting for a final design.
You’ll need to pay extra for continued support. In addition, if you experience an issue down the line or need to grow, this will be an added expense.
Custom Theme Vs. Premade Theme
Control
Premade Theme is like getting a ready-made house delivered to your new site by a building contractor. It will be easy for you to move in. In addition, plugins such as Elementor and Divi allow you to build a complete website without coding knowledge if you have selected a theme that supports them.
The Custom WordPress theme requires coding skills in PHP, HTML, CSS, and JavaScript. In addition, it must be built from scratch.
Reliability & Adaptability
With premade themes, you can build reliable sites with lightweight code, resulting in faster server response times since no unnecessary code adds weight to the page. Your website won’t be slowed down by unnecessary code or plugins,
Additionally, custom WordPress theme development is a lightweight theme since it contains the codes required for the specific purpose of creating a website. You’ll need to contact the developer to make changes to the theme.
Budget-Friendly
Premade themes are often chosen by people because of this reason. Theme licenses are among the most affordable components of building a website. In addition, installing and customizing the theme can save a lot of capital if you consider yourself reasonably tech-savvy.
Custom WordPress themes require more effort to build and need to be budget-friendly, which is why theme developers can drain your bank account.
Project Timelines
Using premade themes saves a lot of time in developing your own theme. While it can take weeks or months to build a custom WordPress theme, depending on the project length.
12 Things To Consider When Selecting A Premade WordPress Theme
Can the theme relate to my website content?
Is it easy to customize to fit my brand?
Will it be aesthetically pleasing to not only me but also my visitors?
Is it SEO optimized?
Is it mobile-responsive?
Is it compatible with different browsers?
Does it support popular plugins?
Is it easy to set up?
Is there a support option?
Excellent user reviews and ratings?
Is the WordPress theme further developed and updated?
Is it Seo Optimized SEO?
5 Most Popular And Best Free WordPress Themes In 2023
1. Astra
The Astra theme offers a lightweight, SEO-friendly foundation that you can customize to create a design that’s uniquely your own. Coding is not required.
Key Features of Astra
Responsive WordPress theme with numerous page layouts
Can use it for any site, blogs included
Lightweight, responsive designs for mobile devices
Compatible with the Gutenberg block editor
SEO optimized for search engines
Translation ready
WooCommerce support for business websites with e-commerce stores
2. Neve
You can import Neve with a few clicks if you want an out-the-box design for your WordPress site. Our theme has also grown to become our flagship despite being newer than some of our other creations. Its popularity exploded quickly on the themes scene, contributing to its popularity. As soon as it was released, it went to the popular tab at WordPress.org, where it remains.
Key Features of Neve
Responsive theme design
Built to work well with the new WordPress block editor
One-page design
Customization options in the real-time WordPress Customizer
Mega menu support
Importable demo sites
WooCommerce is compatible with online shops
3. Writee
There is a space for a bold, full-width featured image in Writee, a clean theme option that focuses on your writing.
Key Features of Writee
Responsive design with responsive themes
Clean, minimal looks
Bold featured images (that’s where the “striking visuals” come from)
Multiple blog archive options — list or grid view
Customization via the native WordPress Customizer
Full-width or boxed slider
WooCommerce integration compatibility for e-commerce stores
4. GeneratePress
It is an adaptable, lightweight chameleon that you can use for various niches and needs. Performance tests typically place GeneratePress at the top of the pack, which is good if you want a fast-loading blog. Beyond that, it also comes with over-the-top good support.
Key Features of GeneratePress
Super lightweight and performance optimized (under 30 kb)
Tons of customization options in the native WordPress Customizer
Compatible with the Gutenberg block editor
One of the best free responsive WordPress website themes with a great mobile design
Excellent code quality
Integrates well with all major page builders, including Elementor and Beaver Builder
WooCommerce plugin compatible with e-commerce stores
5-star rating on over 800 reviews at WordPress.org
5. Storefront
WooCommerce’s official theme. Despite its essential features and customization options, it only offers a little more. Page builders work well with the design. Because this theme is an official WooCommerce theme, you can depend on it to work with the platform without any weird glitches. WooCommerce support is also available if you need it.
Key Features of Storefront
Lightweight Theme
Seamless Integration
Responsive Design
Clean and Simple Design
Customization Options
Final Lines
It may be your dream to have a fancy custom website, but I strongly recommend avoiding a custom WordPress theme. Premade themes are more reliable, inexpensive, and easy to customize. Combining ongoing support and getting precisely what you want can save you time and money and avoid headaches.
Moreover, you can buy some non-custom themes for as little as $39 on ThemeForest, so compare your options before choosing one. A fully customized WordPress theme will cost you much more than a fully customized theme.
Creating a custom WordPress theme is more complicated, time-consuming, and expensive — but if you are still interested in building a custom WordPress theme, you need an expert’s assistance. And here at V2 Web Solutions, we provide custom WordPress theme development services.
1 note
·
View note
Text
What Do Web Designers Use to Build Websites?

What Do Web Designers Use to Build Websites? What do web designers use to build websites? These elements are vital to the site's success, and testing is an important part of building a website. What Do Web Designers Use to Build Websites? They must also consider conversion-generating elements and ensure pages work on different platforms. Wix Wix is a website-building platform that allows web designers to create simple but effective websites. - Its drag-and-drop features allow for easy site creation, and there is a professional ready-to-use template. - Wix claims to respect its users' privacy, but it collects personal and non-personal information. Free and Premium Plans - Wix offers both free and premium plans for building websites. - Premium plans start at $4 per month and go up to $24 per month. - Wix also offers a marketplace of apps for its customers to enhance their website. - The free versions of the company's software are excellent for casual use, but advanced functionality requires upgrading to the commercial version. Squarespace If you are looking for a site-building platform that is affordable and easy to use, Squarespace is an excellent choice. - If you do not have the time or technical expertise to build your website, you may not be best off using this option. - The Squarespace website builder has many options for building a site. Drag-and-drop Editor - It allows users to customize their site's design and layout using a drag-and-drop editor. - The editor allows you to manage multiple pages and easily swap images, text, or other elements. InVision Studio InVision Studio is an advanced design tool that supports rapid prototyping, animation, and design systems. - Its tools include an advanced layout engine, built-in animations, and shared component libraries. - InVision Studio's advanced mobile responsive feature helps web designers create designs for multiple screens and devices. - InVision Studio is a web designer's paradise. - The platform allows collaboration across teams and users to create and review wireframes. - It is available as a free trial or subscription plan with prices starting at $7.95 per user per month when billed annually. Cloud-based - InVision Studio was originally a cloud-based prototype service integrated with Photoshop and Sketch. - It is an enhanced version of Sketch but with many collaboration tools, motion animations, and sharing options. - It is available in free and paid versions and has a large user base among designers. Elegant Themes There are many benefits to using Elegant Themes to build a website. - Not only are the templates easy to customize, but they also have clean code for SEO purposes. - The company constantly improves its product line and offers a 30-day money-back guarantee. Divi Builder - There are two different membership options. - Both give you access to several plugins and themes. - The Divi Builder plugin is a good choice if you use the Divi theme. What Do Web Designers Use to Build Websites? YourNameWebsite Read the full article
0 notes
Text
divi of avada
Als je op zoek bent naar een nieuw thema voor je site, zijn er twee opties waar je waarschijnlijk al van hebt gehoord: de immens populaire divi of avada, van Elegant Themes, en Avada, de bestseller op ThemeForest.
Beide WordPress-thema's zijn volledig multifunctioneel. Dit betekent dat, ongeacht het type website dat u bouwt, of het nu een eenvoudige blog, een volledig uitgeruste online winkel of iets daartussenin is, u met Avada of Divi een heleboel functies en opties krijgt.
Hoewel dit beide uitstekende WordPress-thema's zijn, zijn er enkele belangrijke verschillen. Lees dus verder om er zeker van te zijn dat u de juiste kiest voor uw project.
We beginnen met een overzicht van elk thema voordat we verder gaan om het uiterlijk, de belangrijkste functies en de algehele prijs-kwaliteitverhouding te vergelijken. Laten we beginnen…
Divi-overzicht
Divi is het vlaggenschipthema van Elegant Themes - een van de meest populaire WordPress-themabedrijven in de branche.
Divi, uitgebracht in 2013, is voortdurend verbeterd en bijgewerkt en is met elke nieuwe versie steeds sterker geworden.
Belangrijkste kenmerken van Divi
Dankzij een continu groeiende functieset, evenals constante verbeteringen, kan Divi nu worden gebruikt om vrijwel elk type website te maken. Het maakt niet uit hoe groot of klein uw project is, het gebruik van Divi zal niet overdreven zijn, en u zult ook niet meer willen.
Divi Drag-and-Drop Visual Page Builder
De kernfunctie van dit thema is de Divi Builder - een tool voor het maken van pagina's met slepen en neerzetten die is ontworpen om gebruikers te helpen gemakkelijk hun eigen aangepaste paginalay-outs te maken.
Aanvankelijk was Divi Builder een tool voor het maken van back-endpagina's. Na een update heeft deze paginabuilder nu echter een front-end WYSIWYG visuele editor - wat betekent dat je een live preview van je pagina krijgt terwijl je eraan werkt. U kunt eenvoudig op een item klikken om eraan te werken, inclusief inline tekstbewerking.
Om de lay-out van uw pagina's precies goed te krijgen, kunt u elementen op hun plaats slepen en neerzetten en snel secties vergroten of verkleinen met uw muis. Als u overschakelt naar de nieuwe wireframe-weergave, worden de omtrek van de paginalay-out en de namen van de modules die deze bevat, weergegeven, waardoor het gemakkelijker wordt om precies te zien welke elementen zich op uw pagina bevinden en hoe deze is gestructureerd.
De toevoeging van de onbeperkte functie voor het ongedaan maken en opnieuw uitvoeren van de geschiedenis, evenals de mogelijkheid om pagina-elementen te kopiëren en te plakken, is ook handig. Over het algemeen heeft deze upgrade de Divi Builder aanzienlijk verbeterd, waardoor een intuïtieve ervaring voor het bewerken van inhoud wordt geboden.
Met de Divi Builder kunt u aangepaste lay-outs maken voor zowel berichten als pagina's met behulp van rijen en kolommen. Deze rijen en kolommen kunnen vervolgens worden gevuld met een van de 43 inhoudsmodules.
Naast vrij standaard inhoudsmodules, zoals tekst, afbeeldingen, knoppen en galerijen, vindt u een krachtige selectie van functies - functies waarvoor u normaal gesproken extra plug-ins moet installeren om te gebruiken. Dergelijke modules omvatten prijstabellen, sliders, getuigenissen, portfolio's en nog veel meer.
Alle Divi Builder-modules kunnen worden gepersonaliseerd via de visuele interface — compleet met een liveweergave van uw wijzigingen terwijl u ze aanbrengt. Hierdoor kunt u ervoor zorgen dat elk element op uw website past bij uw algehele ontwerp. Je bent ook vrij om je eigen aangepaste CSS toe te voegen om je lay-outs en de elementen die ze bevatten te personaliseren.
Met de Divi Builder is het ook heel eenvoudig om de algemene of standaardinstellingen van een module aan te passen. Door de nieuwe editor voor algemene standaardinstellingen te gebruiken, kunt u de standaardeigenschappen van een module, zoals de lettertypen of kleuren, rechtstreeks via de Divi Builder-interface aanpassen terwijl u een pagina maakt. Alle wijzigingen die u aanbrengt, worden vervolgens toegepast op alle exemplaren van die module op uw hele site.
Het is vermeldenswaard dat de Divi Builder nu ook beschikbaar is als een zelfstandige WordPress-plug-in die naast elk thema kan worden gebruikt. Lees voor meer informatie snel onze Divi Builder-plug-inrecensie.
0 notes
Text
Divi v/s Beaver Builder Comparison Features (2020)
Page builder plugins are very famous. Beaver Builder and Divi offer one of the most popular options. Both plugins are fully responsive solutions that help users to manage the design and response of their custom posts, pages, and blog posts. I’m going to use this article to compare Divi vs Beaver Builder features, options, and pricing. You can then use this information to decide which option is best for you. The concept of creating pages shouldn’t have to alter code was not known till now. Nowadays, visual page builders accomplish all of the tasks that were formerly handled by expert web developers. Drag and drop interfaces make work a lot easier and faster. You don’t have to struggle like olden days and forth between backend and frontend to see how your changes look.

Divi vs Beaver Builder Comparison
In this comparison, lets analyze the modules, module settings, and structures of each of these page editors. let’s discuss each page builder template’s options, features, pricing, and advanced customization options. I’ll provide you with as many details as possible so that you can decide which is better for your needs. Divi or Beaver Builder?At the end of the post you can find side by side comparison.
User Interface
The user interface is one of the first things that should be reviewed when considering any tool. The interface is often a personal preference. You probably won’t use a particular page builder if you can’t comprehend or enjoy its user interface. An effective user interface needs to be intuitive. It should be simple enough to grasp after only a few minutes of use. A page builder interface should also be useful in helping you achieve the overall results that you want for your site pages.The interface alone doesn’t make a plugin great. However, the look and feel of a user interface can sometimes mean the difference between a project’s success and failure.
Beaver Builder
Beaver Builder’s frontend editor allows you to verify changes as they’re being made. The editor is easily used for custom post types, pages, and regular posts. You can either use a particular template and tweak it according to your requirements, or you can design from scratch. If you want to add new content to one of the pages, you’ll use Beaver Builder’s “rows” to add that content. Horizontal and vertical columns can be placed in these rows. These columns will hold the page’s content modules. Beaver Builder’s editor has nine column frameworks to use. You can resize, add, or delete columns as you see fit. One noteworthy shortcoming is the fact that Beaver Builder doesn’t have an edit history function. This means that you can’t go back to review previous changes that you’ve made to your pages and undo them.
Divi Builder
Divi’s interface,either you can us for the backend by overwriting WordPress’ standard editor or on the frontend by using the visual editor. Both methods allow you to use the editor for your custom post types, regular posts, and pages. Page layouts are where you’ll find Divi’s elements. You just have to select the element that you want and then arrange it on the page. You can also integrate additional elements from Divi’s extra modules.Divi’s editor can be used to create your pages in portions with rows, columns that you add to rows, and modules that you add to columns, much like Beaver Builder. Divi has many different column templates. Divi’s wireframe mode is one of its best features. You can switch to this view to see the structure for the page that you’re working on. This option can come in handy if you want to see how a particular page was designed or if you want to find the modules that were used on that page.
Content Modules
Both Divi and Beaver Builder refer to their elements as modules. Modules are smaller sections that are used to design page content in WordPress page builders.
Beaver Builder
Beaver Builder has over 30 different basic modules, which are divided into six categories. It also has a set of WordPress widget modules that can beadjusted anywhere in your WordPress content’s layout. The basic modules are typical content modules, such as an HTML module and modules for buttons, headings, text, and video. In the Action category, you can use a Call to Action module. It includes a text editor, heading and button that’s already built-in. Using this you can add any necessary calls to action to your pages faster.There’s also a Callout option that has all of the features and an additional image option. You can use the Subscribe Form and Contact Form modules to include specific actions for your site users to be get in touch. The Media category includes modules that lets you to integrate Font Awesome icons, galleries, maps, sliders, and testimonials to your pages. Modules in the Layout category useful to show images, data, pricing table, and other relevant content. There’s also a Sidebar module that allows you to use any of your current WordPress sidebars in pages edited using Beaver Builder.The final categories have post-based modules. These modules allow you to integrate various elements to your posts, in addition to the typical counter and countdown elements.
Divi Builder
Divi’s modules are broken down alphabetically instead of by category. There is no module just for headings. Divi lets you use the text editor mode to add headings. This shouldn’t be a big deal, but it can take a little more time. Another common hinrdance is the fact that you can’t put the sidebars from your theme into the Divi Builder content layout, and you can’t use Divi Builder to integrate WordPress widgets like you can when using Beaver Builder.
Both Divi and Beaver Builder are just like siblings. You get roughly the same number of modules in each, but they’re handled differently in each plugin.Divi has individual modules for a bar counter, circle counter, and numbers counter, whereas Beaver Builder combines all of these choices into just one Number Counter module. Both plugins are compatiblefor woocommerce, modules work well with woocommerce and other third-party plugins. These modules are activated when the particular third party plugin is activated and installed.
Styling
Styling which allows you to change style, such as colors, font, alignment, etc. This is an essential part if you want your site to look fantastic.
Beaver Builder
Each Beaver Builder module has settings that you can customize. These settings are divided into tabs based on the style, content, or features of that module. You can configure settings for alignment, colors, fonts, and other elements.The Colors which are nothing but RGBA or hex value or using the color picker that’s included. Google is used to add custom fonts. Other web fonts can be integrated by adding a few lines of code. Videos, images, slideshows, colors, and color gradients can be added to customize row backgrounds. Edge and border effects can be used to change how your row boundaries look. Similar but more limited settings are available for columns. Advanced tabs exist for almost all Beaver Builder columns, rows, and modules. These settings have lets anyone to go beyond the basic styling selections. They allow you to determine how each item will behave and appear. Options include padding that allows you to choose different values according to device sizes and establish margins. There are also HTML settings where you can define the appropriate classes or IDs to be used. You can also alter visibility settings. For example, you can pick from an impressive amount of different animations and then select their durations and delays. Modules can be limited to be shown only to users who have logged in or can be hidden on devices of particular sizes.
Divi Builder
Divi’s Content Section where you can arrange and integrate module content. The Design section can be used to customize the styles for each module.You get at least one unique setting or more for every module. For instance, the Blurb module unique setting allows you to adjust an element’s icon or image uses. Many Divi modules’ setting menus also include settings for text information. They allow to edit margin, padding, height, width, text alignment, colors, and font settings. Animations, box shadows, and borders can be customized in the Content section. You can apply filters for contrast and sepia tone, brightness, and saturation here. Animations, box shadows, and borders can be customized in the Content section. You can apply filters for contrast and sepia tone, brightness, and saturation here. The Advanced section lets you to integrate custom CSS and standard CSS ID and classes to your modules. Modules can be hidden on certain devices, and transitions can be edited.
Templates
Pages can be made using either an existing template and make changes to it or by creating a new page from scratch. Both Divi and Beaver Builder have a good selection of templates to choose from.
Beaver Builder
Beaver Builder templates are divided into three categories: Landing Pages, Contact Pages, and Saved Templates. There is no any Block templates in Beaver Builder, but you can integrate your own by installing and activating Beaver Builder addons, which are third party plugins. The templates are only available in the paid version of the plugin. There are no templates in the free edition of Beaver Builder. So that if you’re going to use a free version, you’ll have to create pages from scratch. Landing Page templates are used to create unique landing pages. There are more than 50 different landing page templates to choose from. Contact Page templates which goes well with home pages, contact pages, “about us” pages, and other particular content pages. Beaver Builder has about 25 contact page templates that can be used. Saved templates are your own customized templates. The Beaver Builder page builder can be used to craft templates that you can preserve for later use, similar to the option that Elementor offers. Beaver Builder also allows you to import templates, but the processbit complicated than elementor.
Divi Builder
Divi’s users have over a thousand different layouts to pick from you, and you can even add more features by using third-party Divi addons. Their layouts are broken down into website packs, which makes it easier to find specific templates from their growing library. Every website pack usually has layouts for “about us” pages, blog pages, contact pages, landing pages, portfolios, and other specific content pages.Everything you need is in one central location. This is a huge time saver. You can even mix and match layouts from different website packs if you want. Each layout can be used as-is or can be customized according to your requirements. You have a lot of templates (or page layouts, as Elegant Themes calls them) at disposal. You can load a layout that was already designed, and then customize the images, text, and other content to create a unique, appealing website. This is an excellent option for individuals, developers, and site owners who want to create their own sites but don’t have a lot of confidence in their coding and design abilities.
Divi vs Beaver Builder Conclusion
Beaver Builder is easy to pick up and understand, but Divi offers more customization choices. Both page builders provide very professional layouts that can be used for a variety of industries and niche sites.Beaver Builder has 50 templates, while Divi has over 140 layouts to use. At $89, Divi is also a little less expensive than Beaver Builder, and all Elegant Themes products are included in Divi memberships.One disadvantage of using Divi is that it is a little slow when compared to other popular page building plugins. Page builder launching is simple enough, but operating current modules and adding new ones can take more time than expected. Most operations seem to require just a few more clicks than performing those same actions in Beaver Builder. Another Divi weakness is the difficulty in transitioning away from the page builder. People who support Divi’s heavy shortcode use have stated that the number of shortcodes left behind when you deactivate the plugin shouldn’t matter because you’re going to have to rebuild pages anyway. However, you still need to remove each shortcode before copying and pasting content into a different page editor. This process can take a long time if you have many blog posts made with Divi. Beaver Builder is fast. It has a fresh, intuitive user interface. Its content modules are well designed, and there are plenty of template choices that allow you to customize your site however you want. You won’t have any difficulties moving away from the plugin, thanks to Beaver Builder’s clean code. Divi has more pre-designed layouts and customization choices than Beaver Builder. They also have five additional products that are included with Elegant Theme memberships at no extra charge. These features give users more bang for their buck.Drag and drop WordPress page builders with easy to use interfaces are great resources for creating appealing and effective web pages in a matter of minutes, and both Divi and Beaver Builder would be good choices.
The post Divi v/s Beaver Builder Comparison Features (2020) appeared first on The Coding Bus.
from WordPress https://ift.tt/3dBVvpk via IFTTT
0 notes
Text
0 notes
Link
Toolset Divi Integration is a WordPress Plugin being developed by WP Types. Toolset Divi Integration lets you design the site’s wireframes with Toolset and use Divi Builder for the content. Toolset Divi Integration Features : Divi Cells Divi Rows Options And more… Download Now Toolset Divi Integration at WooCrack.us. You’ll receive the exact .zip file you would download from the original author. If you buy on woocrack.us, you can save your money up to 99% and 100% virus free.
0 notes
Text
New Post has been published on Website Design Naples Florida Webmaster
New Post has been published on https://vinbo.com/the-free-divi-wireframe-kit-layout-design-tutorial/
The Free Divi Wireframe Kit Layout Design Tutorial
youtube
In this video we walk you through how to use our Divi Wireframe Kit to create any number of impressive Divi pages. Get all the files you need to follow along in the accompanying blog post.
Get the free files here:
How to Use the Divi Wireframe Kit to Create Professional Landing Pages
0 notes
Video
youtube
Divi Theme Sticky Floating Social Media Buttons Wordpress
How to create floating sticky social media buttons with the Divi Theme. In this video we will be creating a row that has some social media buttons that link to the profile pages. We are going show 2 options with this row. One to make itfixed position so the buttons are visible at the bottom of the page at all times. Another option is to make the row sticky so it sticks to both the top and bottom of the page when scrolling. Today we will be demonstrating how to build this great feature with the Divi Social Media Follow Module. This is a very eye catching and a great frature to have on your Divi site.
In this video we will cover:
Adding A Divi Social Media Follow Module. Configuring The Divi Social Media Follow Module. Using Fixed Positioning. Using Sticky Positioning. Using Wireframe Mode. Adding An Admin Label.
We are going to be using the Divi theme to create some great effects in this series of videos. The Divi theme has some great modules and effects. With a little work you can achieve some great eye-catching effects to enhance the look and user experience of your website So, follow along with the video and see how to create a section that will popup on button click with the Divi Theme with the Divi Theme.
Download The Code From Here: https://help.elegantthemes.com/en/articles/2730977-opening-divi-modules-in-a-lightbox
Try out the Divi theme: https://bit.ly/TryDiviNow
Divi Supreme Modules Pro Plugin 10% Off: https://bit.ly/DiviSupremeCoupon
Divi Supreme Modules Light Plugin: https://divisupreme.com/divi-plugins/?ref=6
Divi Supreme Modules Playlist: https://www.youtube.com/watch? v=ZAO2MH0dQtk&list=PLqabIl8dx2wo8rcs-fkk5tnBDyHthjiLw
Playlist page for more videos on this: https://www.youtube.com/c/System22Net/playlists
Full Ecommerce Site Build Playlist: https://www.youtube.com/watch? v=rNhjGUsnC3E&list=PLqabIl8dx2wq6ySkW_gPjiPrufojD4la9
Contact Form With File Upload Video: https://youtu.be/WDo07nurfUU
Divi 4 Theme Create An Ecommerce Store In One Hour: https://youtu.be/qP-ViPakoSw
My Blog : https://web-design-and-tech-tips.com
Check out our playlist page for more videos on this: https://www.youtube.com/c/System22Net/playlists
Sub: https://www.youtube.com/channel/UCYeyetu9B2QYrHAjJ5umN1Q?sub_confirmation=1
0 notes
Text
Best WordPress Business Themes, Corporate, Small and Large Businesses | Templified
New Post has been published on https://templified.com/best-wordpress-business-themes/
Best WordPress Business Themes, Corporate, Small and Large Businesses
If you are searching for that perfect theme for your business, you’re in the right place. There are thousands of different business themes available. Not all are perfect for everyone. That’s why we have chosen such a wide array of business themes to help get you started.
Running your business can be time-consuming. The last thing you will want to do is have to spend a lot of time on your website. Each theme in this collection is going to be a huge time saver for you. They’ll allow you to work smarter, not harder, setting up a great-looking website.
There are some features that every business theme is going to offer. Things like a contact form that comes bundled with your theme. Allowing customers and potential customers to make contact with you is critical. You’ll also want to show all the pertinent information about your businesses location and hours. That’s assuming you have client-facing services. Sometimes, all you need is an online presents to get out the basic information. We have included several things that are perfect for this as.
Every theme outlined in this collection has responsive design and layout flexibility. They are all easy to set up and easy to customize. So, no matter which of these themes you choose, you’re going to get all the tools needed to build a successful website.
This collection of small business WordPress themes can really help drive traffic to your website, thanks to the fact that these are among the most SEO friendly WordPress themes ever created. Our full collection of business WordPress themes is thorough and large, it can help give you a ton of options for building your website. There are tons of themes out there for businesses so it can be difficult to find the very best while leaving the poorly rated themes, the themes without the features you want. We’ve done the hard work of finding all the very best business themes around. So, here we go.
Divi, Premium WordPress Drag and Drop Business Theme
Divi might be the most popular WordPress theme in the world, and it’s certainly among one of the very best. This theme is incredibly flexible. Divi offers tons of different starting points to help you build a successful website. No matter what type of business you are running, divi gets the job done. Divi is by Elegant Themes, one of the leading producers of WordPress templates out there. Their support is fantastic and the documentation is thorough. There are hundreds of different pre-made templates that you can download and install. All it takes is a few clicks. Divi will end up saving you more time to run your business. That’s something that I know a lot of business owners and entrepreneurs will appreciate
Demo More Information Get Hosting
Castor, Premium Drag and Drop Business and Consulting Theme
Castor is a great-looking WordPress theme for finance companies and businesses. It’s got a wide variety of pre-made demo’s, responsive inner pages and loads of theme options to keep you customizing to your heart’s content. is SEO optimized theme is great for consulting businesses, insurance sales people, accountants and lawyers, startup companies and finance businesses, just to name a few. It looks great on mobile devices and tablets as well, thanks to its responsive design. you got various post and Page types, unlimited color schemes, access to all of the most popular Google fonts and icons, just to name a handful of features. this is great for beginners thanks to the one click demo installation and very user-friendly customization process.
DemoMore Information Get Hosting
Okab, WordPress Business Framework Theme
Welcome to Okab, this is an absolutely huge WordPress theme. Okab is a multi-purpose business template with great performance. It’s got a responsive design, clean, light, fast loading and creative. The theme is simple to set up and quite flexible. Okab gives you a modern design that is suitable for any type of business. From finance to consulting, creative agencies to corporate style websites. Online shops, blogs, hotels, startups, small businesses and large. Okab is among the highest rated WordPress themes ever made. It’s very easy to recommend this particular theme to any business owner who wants a lot of flexibility and great-looking website
Demo More Information Get Hosting
Box Shop, WordPress eCommerce and Business Theme
Box Shop is WordPress WooCommerce theme that is designed for online shopping and businesses that want feature filled portal for promoting and selling products. This is among the very highest rated WordPress themes that I’ve reviewed, just barely shy of a perfect 5-star rating. Box Shop gives you a responsive layout, megamenu, there’s a built-in page builder, plenty of Ajax features and one click installation, just to name a few of the dozens of advantages that this template can give you. It’s easy to use, powerful and just about everyone who has purchased this theme seems to love it.
DemoMore Information Get Hosting
Fortun, Full Screen Business Portfolio Theme
Fortun is multi-concept WordPress theme, it has 18 modern-looking demo styles included so no matter what type of business you are setting up a website for, you’ll have a great-looking starting point to help get you started. With a perfect 5-star rating, Fortun is a stunning, visual, clean and minimal template with plenty of theme options and a built-in page builder. This gives you a lot of flexibility in terms of the design and style of your sight. You got a variety of portfolio layouts, hairstyles and the support and documentation are extensive.
DemoMore Information Get Hosting
Uncode, Business and eCommerce WordPress Theme
Meet Uncode. It’s perfect if you’re looking for a creative, powerful, multipurpose WordPress theme for your business. One cool feature that not all themes offer, Uncode has a massive library of over 400 different wireframe layouts. These helpful presets help you build things like headers and footers. You can create awesome content pages, call to action areas as well as shop pages. There are image galleries, pricing tables, forms and other cool stuff. These are features that any business could make use of. With Uncode, you also get several pre-made website templates to help get you started fast. With over 50,000 sales and counting, the Uncode theme is among the most popular themes on ThemeForest. Uncode shows no signs of slowing down any time soon. How about performance? Uncode is also a fast loading theme which never hurts when it comes to SEO. Users love fast loading websites and so does Google. Providing a great user experience for anyone who comes to your site.
DemoMore Information Get Hosting
Oshine, Corporate Style WordPress Business Theme
With a high quality design, an incredibly intuitive visual page builder, 50 different pre-made demos and hundreds of pre-built sample pages, one click demo installation, fantastic user support and an infinite variety of layout possibilities, Oshine is a true premium business theme. great for portfolios, agencies, shops and blogs, this full feature business theme is one of the most popular and most well-respected themes available. The typography is modern and attractive, the front-end page builder makes it possible to build anything that you want. there are stylish portfolio layouts that can make this great for small photography businesses, a variety of font choices to help keep your website looking exactly like your brand and it is all incredibly simple to use. No matter what language you want to create your site in, Oshine packs a punch and delivers a great user experience.
Demo More Information Get Hosting
Technico
Technico is a smartly-designed, totally responsive and feature rich company theme for WordPress. Technico gives the most up-to-date in drag and drop page building, which means that your home-page will be flexible and operational right in the get-go. Customized widgets also let you add functionality you might expect in a far more expensive theme. Assessing, contact page map, social media and more. You will find just five custom content forms, together with providers, team page, frequently asked questions, manuals and a customer page also. Color schemes may be altered and it is SEO optimized so that you’ll be ranking fast with this complete powered company theme. This exceptionally flexible, gorgeous, stylish, easy to operate and also well-built small business theme lets you promote fresh products, oversee inventory and delivery, sell present things, build your organization and contact buyers and much more.
Demo More Information Get Hosting
Waxom
Waxom includes a whole group of demonstration websites, so please click below to have a peek at them. I needed to select 1 picture, so I chose a kind of advertising agency set up, however there are a great deal of intriguing demos to select from. This unbelievable portfolio theme is nicely made, very simple to use, excellent, adaptable and full of creative attributes, Waxom is characteristic packed, smartly coded and flexible, perfect for advertising agencies, photography fans, internet advertising companies, designers or boutique design companies. You are able to make a lasting first impression with a pretty WordPress portfolio theme for example Waxom.
The top WordPress drag and drop webpage builder plugin is Visual Composer, as it’s a really powerful and incredibly adaptable procedure to produce the type of web site you’d like using the layout and functions that you require, so the simple fact that it is included here’s a true bonus. Visual Composer works with all the top third party plugins like Contact Type 7, equally Gravity and Ninja Types, WooCommerce, Vital Grid and Sliders such as Revolution or even Layer Sliders. Making this highly effective multi-purpose theme quite, very practical. What I really like is that the most time saving resources, the affordable cost, that it is easy to use, which it is compatible with everything along with also the flexibility to create any style of exceptionally functional website. Popular features include the professional assistance, simple to use front end editor, tons of material components, gigantic template library and fully responsive layout, and tons more. For our full selection of WordPress WooCommerce themes, try this link.
Demo More Information Get Hosting
Gretna
This theme is called a Gretna and it’s a digital agency WordPress theme or theme for an SEO agency. This theme was actually featured on themeforest as a featured item of the week. That really boosted its popularity in the beginning, it’s sold over 100 times so far. Given that received a perfect 5-star rating, I think it was a pretty successful stay as the featured item of the week. This multi-purpose template comes with plenty of different Blog Page layouts, landing pages, service promotional pages and more. It’s a theme that is suitable for companies offering SEO services or other internet marketing services. With a purpose oriented design, a perfectly responsive layout and plenty of special features like a pair of different landing pages, multiple blog Styles, image galleries, pricing tables and service Pages, this theme is truly multi-purpose up.
If you want incredibly clean looking WordPress theme, this one is a great choice. I like that it comes with demo content, one click installation and of course, it’s responsive so that it is very mobile-friendly. No matter what language you are using and no matter what your target audience, you’ll be able to translate this theme thanks to the WPML support. Gretna has advanced typography options, you can select any one of a hundred or more different Google web fonts through the Google fonts Library.
It’s powerful way to quickly establish a unique look for your website. Based on the powerful vafpress theme options framework, Gretna has every possible feature you could want to create an amazing SEO service and sales page.
Demo More Information Get Hosting
Atticus
Atticus is a WooCommerce empowered, easy small business blog and earnings theme. It’s simple to customize the appearance of your website with the webpage builder, which can be included at no cost, and of course the many other readily customized pieces through the theme choices panel. WordPress premium themes are a smart, fantastic and totally ideal tool to help begin with a WordpPress based website cheaply and quickly. Such superb prime themes have a lot of functions. Extraordinary advice from the programmer, trouble-free attributes, fantastic excellent design. Your internet business is important, your website actually has to be good. Atticus is a Bootstrap established theme, so the code is rock-solid, it is bbPress ready also, and that means it’s possible to power a forum with it. Entirely totally responsive, heavily flexible concerning typography and color schemes, Atticus is a fantastic way to have a web site on the internet with comparatively few problems. For more WordPress Buddypress themes, try this collection.
Demo More Information Get Hosting
Nimble
Nimble is a large, bold, and pretty theme that does not let its own personality get in the way. With every design I fight to hit a balance between function and style. Nimble’s colors are toned down but still tasty and its design is daring but still leaves space to breath. Navigating Nimble to a 27″ Cinema Screen is quite a cure, but is surfing the theme on a little screen as well because of Nimble’s completely totally responsive layout. For more clean and modern minimalist WordPress themes, check out our full collection. I think you’ll love it.
Demo More Information Get Hosting
Newave
Newave a perfect one page parallax WordPress theme for pretty much any sort of business. Emphasize just about any design work or services that are popular using a strong totally responsive design parallax page. Displaying your very best work with stylish parallax layout is just right and really cool feature folks will end up being helpful and cool. This theme is an unrivaled one-page parallax portfolio theme for all kinds of organizations which would love to exhibit their work at a cool method. This theme is certainly likely to stun and amaze you with its own fun and stylish animated sequences and adjustments which produce your new website seem totally natural. The parallax fashion portfolio site is amazingly valuable and can be definitely readily corrected by using just a few simple mouse clicks.
Demo More Information Get Hosting
X
If you pick the X WordPress theme, you’ll never be lonely if problems or questions arise. Over a dozen seasoned customer service agents can result in throughout the setup process all the way into the last design in case you have some trouble working with the exceptionally intuitive management backend. Many site owners find that making the website they desire using all the X theme is a lot easier than they ever imagined. In hardly any time, even non-developers may produce a visually gorgeous, user-friendly and highly effective site to display all their articles easily. X is cross browser compatible, retina ready and totally responsive for exceptional viewing on any computer or mobile device and permits for the kind of customization which many believe from the technological advantage. For more premium WordPress themes, check this out.
If it comes to value, the X WP theme provides a whole lot more than the cost suggests. This SEO friendly theme offers multiple premium plug-ins are comprised without stuffing the bundle with unnecessary fluff that will probably not be utilized. This focus to consumer benefit is exactly what catapulted X to the top sales standing of almost any WordPress theme based on Envato. It’s used widely by small and massive businesses, creative professionals, accountants, people and just a state authorities. If it comes to innovation in website design and supreme flexibility to do exactly what you need, the X WordPress theme provides quality without query.
Demo More Information Get Hosting
Cool Stuff
Cool Stuff is hot! That’s right, this theme is a real dichotomy, it brings cool style and hot features together in one package. With a stellar 4.6 rating out of 5 stars, this Tesla Themes offering has a simple layout that’s flat and yet incredibly detailed. Tesla Themes makes great stuff, so you can be sure this one is well coded, well designed and easy to use.
Built for blogs, built for magazines and built for speed, Tesla Themes has included a nice looking, attractive timeline layout that makes your WordPress based site look incredible. I called it a time machine before and that’s a lie, you don’t need 1.21 gigawatts of energy to make this template go.
Cool Stuff isn’t just a blog and it isn’t just about that timeline feature, this is a flat, multipurpose theme that has a crisp minimalist style, the latest features and a powerful framework to make sure everything works smoothly, loads properly and is easy to customize and manage. There’s a dedicated events page to go with that timeline look too, so if you’ve got a blog or magazine where you’re also staging events, it makes it simple to add that feature to your website. The Tesla Framework has always been one of the best frameworks around for building flexible websites, you don’t even need any advanced knowledge of how to code, it’s all done visually through the backend. That means you can’t accidentally break something and that’s a comforting feeling.
Cool Stuff is responsive for amazing display on all size and shape of computer screen, there’s a flat and modern style that people really love, a filterable portfolio, built in short codes, social media sharing, contact form and Google maps too. There’s really very little that this theme can’t accomplish.
Demo More Information Get Hosting
Nerduck
Nerduck is a modernistic portfolio-style theme with an emphasis on bold typography and a fine attention to detail.
This theme is called Nerduck, it’s a minimalist blog and portfolio theme that’s powerful and lightweight, so it loads up fast. It’s also responsive, so it can help you achieve a really fast loading, SEO friendly website that ranks high and helps drive tons of traffic.
Nerduck is a modernistic portfolio-style theme with an emphasis on typography and attention to detail. Show off your latest photos and videos in all their glory with the responsive portfolio grid. Write blog posts with the beautiful, minimal blog. You can have unlimited portfolios, each with it’s own categories and custom settings. You have two or three column types, with or without margins, filtering and a lot of useful features to make your website a perfect showcase of your amazing products!
Nerduck has just surpassed a total of 500 sales on ThemeForest, which is quite an achievement, and the 4.95 rating is a really big achievement. That’s an amazing rating, really. This theme was created on October 25th, 2015, which means it’s been downloaded practically every day it’s been on the market. That’s popular!
I think the reason Nerduck has been so popular, the simple and clean design. Ideal for professional and creative portfolios, agencies and individuals alike will absolutely love this template. Visual Composer powers Nerduck, which means it’s highly flexible. The documentation is thorough, it’s well supported by ClaPat, one of the elite authors on ThemeForest. In terms of theme options, you’ve got a lot of great possibilities for customization. Styling, footer and header options, sliders and blog options too. Not to mention the portfolio options. Nerduck really has a lot going for it, so you should definitely consider this theme for all kinds of portfolio and creative websites.
Demo Get Hosting
Hestia Pro, Material Design One Page Business Theme
DemoMore Information Get Hosting
Zero, WordPress Theme for Mobile Applications Business
DemoMore Information Get Hosting
Fildisi, Clean, Corporate Business Theme for WordPress
DemoMore Information Get Hosting
Kalium, Premium WordPress Business Theme
DemoMore Information Get Hosting
Studio 8, Creative WordPress Theme for Business
DemoMore Information Get Hosting
Massive Dynamic, Premium Quality, Highly Rated Biz Theme
DemoMore Information Get Hosting
Kleanity, Minimalist WordPress Theme for Business
DemoMore Information Get Hosting
Wall Street, Full Screen, Responsive Business Theme
Demo More Information Get Hosting
Zelle Pro, One Page Business Theme for WordPress
DemoMore Information Get Hosting
Azoom Minimal WordPress Business Theme
Demo More Information Get Hosting
Oxygen, Minimalist Business and eCommerce WP Theme
DemoMore Information Get Hosting
Ornaldo, WordPress Blog, Portfolio and Business Theme
Demo More Information Get Hosting
Create, Multipurpose WordPress Business Theme
Demo More Information Get Hosting
Ultra, Drag and Drop Business Theme for WordPress
DemoMore Information Get Hosting
Universal, eCommerce, Blog and Portfolio Theme
DemoMore Information Get Hosting
MF, Highly Rated Business and Creative WordPress Template
Demo More Information Get Hosting
Zuperla, Popular Corporate WordPress Theme
DemoMore Information Get Hosting
Potenza, Startup and Business Theme for WordPress
Demo More Information Get Hosting
Meeting, WordPress Business Conference and Events Theme
DemoMore Information Get Hosting
Cre8or, WordPress Grid Portfolio for Creative Business
Demo More Information Get Hosting
Genesis Expo, WordPress Business Conference Theme
DemoMore Information Get Hosting
Marketing Pro, Solid Corporate Style Business Theme
Demo More Information Get Hosting
Excitor
DemoMore Information Get Hosting
Enfold
Demo More Information Get Hosting
Financia
Demo More Information Get Hosting
Awesome
Demo More Information Get Hosting
The Ken
Demo More Information Get Hosting
CargoPress
Demo More Information Get Hosting
Eames
Demo More Information Get Hosting
MaxHost
Demo More Information Get Hosting
Bookmarks
Demo More Information Get Hosting
0 notes
Text
Creating a “Get Started” CTA that Reveals Multiple Options on Hover
A lot of companies will include a “get started” CTA on there home page. It’s usually is the primary call to action on the page, since it will lead the user through some sort of intended process. It could be a simple “get started now” button that links to another page. Or it could be a section of a page that includes “getting started” instructions and/or different options the user can take to start the process intended by the company.
In this tutorial, we’re going to show you how to create a “Get Started” CTA that will reveal multiple “Getting started” options on hover. Using Divi, we will design a section to appear as a large button. Then when hovering over the button, the options will appear much like a vertical slider would reveal the next slide.
The design is elegant and the functionality could be useful in many ways.
Let’s get started.
Sneak Peek
Here is a quick look at the “Get Started” CTA we will build in this tutorial.
Download the “Get Started” CTA Divi Layout for FREE
To lay your hands on the design from this tutorial, you will first need to download it using the button below. To gain access to the download you will need to subscribe to our Divi Daily email list by using the form below. As a new subscriber, you will receive even more Divi goodness and a free Divi Layout pack every Monday! If you’re already on the list, simply enter your email address below and click download. You will not be “resubscribed” or receive extra emails.
Download the Files
.et_bloom .et_bloom_optin_1 .et_bloom_form_content { background-color: #4843d2 !important; } .et_bloom .et_bloom_optin_1 .et_bloom_form_container .et_bloom_form_header { background-color: #ffffff !important; } .et_bloom .et_bloom_optin_1 .carrot_edge .et_bloom_form_content:before { border-top-color: #ffffff !important; } .et_bloom .et_bloom_optin_1 .carrot_edge.et_bloom_form_right .et_bloom_form_content:before, .et_bloom .et_bloom_optin_1 .carrot_edge.et_bloom_form_left .et_bloom_form_content:before { border-top-color: transparent !important; border-left-color: #ffffff !important; } @media only screen and ( max-width: 767px ) {.et_bloom .et_bloom_optin_1 .carrot_edge.et_bloom_form_right .et_bloom_form_content:before, .et_bloom .et_bloom_optin_1 .carrot_edge.et_bloom_form_left .et_bloom_form_content:before { border-top-color: #ffffff !important; border-left-color: transparent !important; } }.et_bloom .et_bloom_optin_1 .et_bloom_form_content button { background-color: #f92c8b !important; } .et_bloom .et_bloom_optin_1 .et_bloom_form_content .et_bloom_fields i { color: #f92c8b !important; } .et_bloom .et_bloom_optin_1 .et_bloom_form_content .et_bloom_custom_field_radio i:before { background: #f92c8b !important; } .et_bloom .et_bloom_optin_1 .et_bloom_border_solid { border-color: #f7f9fb !important } .et_bloom .et_bloom_optin_1 .et_bloom_form_content button { background-color: #f92c8b !important; } .et_bloom .et_bloom_optin_1 .et_bloom_form_container h2, .et_bloom .et_bloom_optin_1 .et_bloom_form_container h2 span, .et_bloom .et_bloom_optin_1 .et_bloom_form_container h2 strong { font-family: "Open Sans", Helvetica, Arial, Lucida, sans-serif; }.et_bloom .et_bloom_optin_1 .et_bloom_form_container p, .et_bloom .et_bloom_optin_1 .et_bloom_form_container p span, .et_bloom .et_bloom_optin_1 .et_bloom_form_container p strong, .et_bloom .et_bloom_optin_1 .et_bloom_form_container form input, .et_bloom .et_bloom_optin_1 .et_bloom_form_container form button span { font-family: "Open Sans", Helvetica, Arial, Lucida, sans-serif; } p.et_bloom_popup_input { padding-bottom: 0 !important;}
Download For Free
Join the Divi Newlsetter and we will email you a copy of the ultimate Divi Landing Page Layout Pack, plus tons of other amazing and free Divi resources, tips and tricks. Follow along and you will be a Divi master in no time. If you are already subscribed simply type in your email address below and click download to access the layout pack.
DOWNLOAD
You have successfully subscribed. Please check your email address to confirm your subscription and get access to free weekly Divi layout packs!
To import the layout to your page, simply extract the zip file and drag the json file into the Divi Builder.
Let’s get to the tutorial shall we?
What You Need to Get Started
To get started, you will need to have the following:
The Divi Theme installed and active
A new page created to build from scratch on the front end (visual builder)
Images to be used for mock content
After that, you will have a blank canvas to start designing in Divi.
Implementing the “Get Started Here” CTA Design in Divi
The basic idea behind this design is to move the content of a section upward when hovering over the section. To do this we need to make sure our section has a fixed height with overflow hidden. This will hide the CTA options before the hover state. Then we can use margin to position our modules and top padding to move the content into view on hover.
Let’s start with the section.
Creating the Section
To kick things off, create a regular section with a one-column row. Then before we add any modules, let’s update the section settings.
Open the section settings and update the following:
Background Color:#2b87da Width: 90% Max Width: 1100px Section Alignment: center Margin: 6vw top, 6vw bottom (just to give it a little room to breathe) Padding (desktop): 300px top, 0px bottom Padding (tablet): 0px top, 15% bottom
Then add some rounded corners. This will create our button-like design whenever we give the section a max height.
Rounded Corners: 140px (desktop), 20px (hover), 10px (tablet)
Then give it a box shadow (see screenshot).
We aren’t going to add all of the settings necessary for the final design at this point. We’ll need to come back and give it a fixed height and a hover effect. But for now let’s add the content.
Creating the First Row of Content
Open the settings for the one column row you created and update the following:
Width: 100% Padding: 0px top, 0px bottom, 5% left, 5% right
Inside the one column row, add a text module.
Then add the following h2 heading to the body content.
<h2>Get Started Here...</h2>
Update the design settings as follows:
Heading 2 Font: Nunito Heading 2 Font Weight: Bold Heading 2 Text Color: #ffffff Heading 2 Text Size: 78px(desktop and tablet), 46px(phone) Max Width: 500px Height: 300px(desktop), auto (tablet and phone) Margin: -300px top (desktop), 0px top (tablet and phone) Padding: 7% top
The 300px height and the -300px top margin brings the text module up to fill the 300px top padding of the section. Later whenever we take away the top section padding on hover, the text module will scroll upward above the section.
Creating the Second Row of Content
The second row of content is where we will add our CTA options. Go ahead and add a new row with a three-column layout.
Then update the row settings as follows:
Width: 100% Max Width: 100% Padding: 0px top, 0px bottom
Then add a blurb module in column 1.
Then update the blurb settings as follows:
Take out the default body text and leave the Title.
Then Add an image icon (90 X 90). Or you can use a regular Divi icon if you want.
Add a background and update the design of the title text.
Background Color: #ffffff Title Font: Nunito Title Font Weight: Ultra Bold Title Font Style: TT Title Text Alignment: Center Title Text color: #2b87da Title Text Size: 14px
Before we can make the blurbs circular, first we need to give the blurb an equal height and width. Then we can use spacing to align the blurb and blurb content in the center.
Content Width: 200px(desktop), 250px(tablet) Width: 250px (desktop), 300px (tablet) Module Alignment: center Height: 250px (desktop), 300px (tablet) Margin: 25px top, 0px bottom Padding: 50px top (desktop), 75px top (tablet and phone)
To complete the circle design, give the blurb a rounded corner and a box shadow.
Rounded Corners: 50% Box Shadow: see screenshot
That takes care of our first blurb. To create the next two. Copy the blurb and paste it into column 2 and column 3. Then update the image icon for each. It should look like the following:
Final Touches to the Section
To complete the “Get Started” CTA design, we need to update the section a bit more. Update the following section settings:
Height: 300px (desktop), auto (tablet and phone) Horizontal Overflow: hidden Vertical Overflow: hidden
This will keep the section the same height as the content in row 1 and row 2. Hiding the overflow will keep the content in row 2 hidden until we bring it up into view on hover.
To bring the row 2 content into view, we need to take out the top padding of the section on hover.
Padding (hover): 0px top
Now check out the result so far. The content will scroll up to reveal the content in row 2 which shows the three CTA options.
To make the section appear more like a button, we can use the transform options to scale it down and then bring it back to regular size on hover. Update the following transform options for the section.
Transform Scale (desktop): 70% Transform Scale (hover): 100% Transform Scale (tablet): 100%
Now add a background image graphic (500 X 500) to take up the right size of the section.
Background Image: insert image Background Image Size: actual size Background Image Position: Center Right (desktop), Top right (tablet), Top left (phone)
Adding Link URLs to the Blurbs and Scaling them on Hover
Since our blurbs are really serving as circle buttons, we need to add module link URLs to each of the blurbs. You will of course need to add your own to fit your needs.
Since the blurbs are hidden in the visual builder, toggle the wireframe view mode and update each of the blurb settings with the module link URL.
Then stay in wireframe view mode and use multiselect to select all three blurbs. And open the settings of one of the blurbs to update the element settings for all three. Then update the transform option as follows:
Transform Scale (hover): 105%
That’s it!
The Final Result
Let’s check out the final design of the “Get Started” CTA.
And here is the design on tablet and phone.
Final Thoughts
The “Get Started” CTA is common on the web today. Hopefully, this tutorial will help you take it to the next level. And, don’t be afraid to think of some other ways to use this functionality. Think about it. You can add any content you want to the section!
Feel free to share your thoughts in the comments below.
I look forward to hearing from you.
Cheers!
The post Creating a “Get Started” CTA that Reveals Multiple Options on Hover appeared first on Elegant Themes Blog.
😉SiliconWebX | 🌐ElegantThemes
0 notes